> For clean Markdown of any page, append .md to the page URL.
> For a complete documentation index, see https://developers.brevo.com/llms.txt.
> For AI client integration (Claude Code, Cursor, etc.), connect to the MCP server at https://developers.brevo.com/_mcp/server.
# Send a transactional email
Transactional emails are automated, non-promotional messages triggered by user actions such as account creation, order confirmations, and password resets.
If you're new to the API, see the [Quickstart guide](/docs/quickstart) before sending your first email.
#### [Static content](#send-a-message-with-static-content)
Send a basic message with a static body or predefined template.\
\
#### [Dynamic content](#send-a-message-with-dynamic-content)
Send a message enriched with contact attributes or with custom variables.\
\
## Before you start
### Retrieve your credentials
Get your API key or configure OAuth 2.0. See the [Authentication](/docs/authentication-schemes) guide for details.
### Register an email sender
Configure your sending domain and sender before sending emails. See [how to set up your senders](https://help.brevo.com/hc/en-us/articles/208836149-Create-a-new-sender-From-name-and-From-email) for instructions.
## Send a message with static content
Send a simple email with static HTML or text content. Use this for straightforward transactional messages without
dynamic variables
or advanced template logic.
**Example attributes:**
#### Subject line
**`subject`** `string` — required
`Hello from Brevo!`
---
#### Sender details
**`sender`** `object` — required
`{ "name" : "Alex from Brevo", "email" : "hello@brevo.com"}`
---
#### Recipient details
**`to`** `object []` — required
`[{ "name" : "John Doe", "email" : "johndoe@example.com"}]`
---
#### Message body
**`htmlContent`** `string`
"`Hello,
this is my first transactional email sent from Brevo.`"
---
**`textContent`** `string`
`Hello, this is my first transactional email sent from Brevo.`
---
**`templateId`** `string`
`345`
---
Use one of the following message body types:
* `htmlContent`: HTML content that defines the message structure and styling
* `textContent`: Plain text content for simple messages like password resets or order confirmations
* `templateId`: reference a template created in the [Brevo Drag & Drop](https://my.brevo.com/camp/template/setup) editor by passing its template ID
You can only pick one of the three body types per request.
### Request
\
#### HTML Body
```curl
curl --request POST \
--url https://api.brevo.com/v3/smtp/email \
--header 'accept: application/json' \
--header 'api-key:YOUR_API_KEY' \
--header 'content-type: application/json' \
--data '{
"sender":{
"name":"Alex from Brevo",
"email":"hello@brevo.com"
},
"to":[
{
"email":"johndoe@example.com",
"name":"John Doe"
}
],
"subject":"Hello from Brevo!",
"htmlContent":"Hello,
This is my first transactional email sent from Brevo."
}'
```
#### Text Body
```curl
curl --request POST \
--url https://api.brevo.com/v3/smtp/email \
--header 'accept: application/json' \
--header 'api-key:YOUR_API_KEY' \
--header 'content-type: application/json' \
--data '{
"sender":{
"name":"Alex from Brevo",
"email":"hello@brevo.com"
},
"to":[
{
"email":"johndoe@example.com",
"name":"John Doe"
}
],
"subject":"Hello from Brevo!",
"textContent":"Hello. This is my first transactional email sent from Brevo."
}'
```
#### Template
```curl
curl --request POST \
--url https://api.brevo.com/v3/smtp/email \
--header 'accept: application/json' \
--header 'api-key:YOUR_API_KEY' \
--header 'content-type: application/json' \
--data '{
"sender":{
"name":"Alex from Brevo",
"email":"hello@brevo.com"
},
"to":[
{
"email":"johndoe@example.com",
"name":"John Doe"
}
],
"subject":"Hello from Brevo!",
"templateId":345
}'
```
\"
```
```typescript response
import { BrevoClient } from "@getbrevo/brevo";
async function main() {
const client = new BrevoClient({
apiKey: "YOUR_API_KEY_HERE",
});
await client.transactionalEmails.sendTransacEmail({});
}
main();
```
```python response
from brevo import Brevo
client = Brevo(
api_key="YOUR_API_KEY_HERE",
)
client.transactional_emails.send_transac_email()
```
```php response
transactionalEmails->sendTransacEmail(
new SendTransacEmailRequest([]),
);
```
```go response
package main
import (
"fmt"
"net/http"
"io"
)
func main() {
url := "https://api.brevo.com/v3/smtp/email"
req, _ := http.NewRequest("POST", url, nil)
req.Header.Add("api-key", "")
res, _ := http.DefaultClient.Do(req)
defer res.Body.Close()
body, _ := io.ReadAll(res.Body)
fmt.Println(res)
fmt.Println(string(body))
}
```
```ruby response
require 'uri'
require 'net/http'
url = URI("https://api.brevo.com/v3/smtp/email")
http = Net::HTTP.new(url.host, url.port)
http.use_ssl = true
request = Net::HTTP::Post.new(url)
request["api-key"] = ''
response = http.request(request)
puts response.read_body
```
```java response
import com.mashape.unirest.http.HttpResponse;
import com.mashape.unirest.http.Unirest;
HttpResponse response = Unirest.post("https://api.brevo.com/v3/smtp/email")
.header("api-key", "")
.asString();
```
```csharp response
using RestSharp;
var client = new RestClient("https://api.brevo.com/v3/smtp/email");
var request = new RestRequest(Method.POST);
request.AddHeader("api-key", "");
IRestResponse response = client.Execute(request);
```
````swift response
import Foundation
let headers = ["api-key": ""]
let request = NSMutableURLRequest(url: NSURL(string: "https://api.brevo.com/v3/smtp/email")! as URL,
cachePolicy: .useProtocolCachePolicy,
timeoutInterval: 10.0)
request.httpMethod = "POST"
request.allHTTPHeaderFields = headers
let session = URLSession.shared
let dataTask = session.dataTask(with: request as URLRequest, completionHandler: \{ (data, response, error) -> Void in
if (error != nil) {
print(error as Any)
} else {
let httpResponse = response as? HTTPURLResponse
print(httpResponse)
}
})
dataTask.resume()
```tp/email" />
### Response
The response includes a `messageId` that you can use to [track deliverability events](https://app.brevo.com/transactional/email/logs) for thi### Response (201)
```json
{
"messageId": "<201798300811.5787683@relay.domain.com>"
}
```tp/email" />
## Send a message with dynamic content
Dynamic content lets you personalize message bodies with attributes that vary per request. Embed variables in HTML content, plain text, or templates.
This guide demonstrates dynamic content using an order confirmation email that includes:
- [Dynamic variables (tracking number, delivery date)](#dynamic-variables-embedded-in-the-request)
- Contact attributes (name, address)
### Dynamic variables embedded in the request
Pass dynamic variables directly in your API request using the `params` object to personalize the message body. Variables are included in the request payload alongside the email content.
**Example attributes:**
`Hello from Brevo!`
`{ "name" : "Alex from Brevo", "email" : "hello@brevo.com"}`
`[{ "name" : "John Doe", "email" : "johndoe@example.com"}]`
`{
"trackingCode": "JD01460000300002350000",
"estimatedArrival" : "Tomorrow"
}`
`Your delivery is expected {{params.estimatedArrival}}.Your tracking code: {{params.trackingCode}}`
`Your delivery is expected {{params.estimatedArrival}}.Your tracking code: {{params.trackingCode}}`
Use one of the following message body types:
- `htmlContent`: HTML content that defines the message structure and styling
- `textContent`: Plain text content for simple messages like password resets or order confirmations
You can only pick one of the two body types per request.
### Request
```curl
curl --request POST \
--url https://api.brevo.com/v3/smtp/email \
--header 'accept: application/json' \
--header 'api-key:YOUR_API_KEY' \
--header 'content-type: application/json' \
--data '{
"sender":{
"name":"Alex from Brevo",
"email":"hello@brevo.com"
},
"to":[
{
"email":"johndoe@example.com",
"name":"John Doe"
}
],
"subject":"Hello from Brevo!",
"params": {
"trackingCode": "JD01460000300002350000",
"estimatedArrival" : "Tomorrow"
},
"htmlContent":"Your delivery is expected {{params.estimatedArrival}}.Your tracking code: {{params.trackingCode}}"
}'
````
\
```curl
curl --request POST \
--url https://api.brevo.com/v3/smtp/email \
--header 'accept: application/json' \
--header 'api-key:YOUR_API_KEY' \
--header 'content-type: application/json' \
--data '{
"sender":{
"name":"Alex from Brevo",
"email":"hello@brevo.com"
},
"to":[
{
"email":"johndoe@example.com",
"name":"John Doe"
}
],
"subject":"Hello from Brevo!",
"params": {
"trackingCode": "JD01460000300002350000",
"estimatedArrival" : "Tomorrow"
},
"textContent":"Your delivery is expected {{params.estimatedArrival}}.Your tracking code: {{params.trackingCode}}"
}'
```
\"
```
```typescript response
import { BrevoClient } from "@getbrevo/brevo";
async function main() {
const client = new BrevoClient({
apiKey: "YOUR_API_KEY_HERE",
});
await client.transactionalEmails.sendTransacEmail({});
}
main();
```
```python response
from brevo import Brevo
client = Brevo(
api_key="YOUR_API_KEY_HERE",
)
client.transactional_emails.send_transac_email()
```
```php response
transactionalEmails->sendTransacEmail(
new SendTransacEmailRequest([]),
);
```
```go response
package main
import (
"fmt"
"net/http"
"io"
)
func main() {
url := "https://api.brevo.com/v3/smtp/email"
req, _ := http.NewRequest("POST", url, nil)
req.Header.Add("api-key", "")
res, _ := http.DefaultClient.Do(req)
defer res.Body.Close()
body, _ := io.ReadAll(res.Body)
fmt.Println(res)
fmt.Println(string(body))
}
```
```ruby response
require 'uri'
require 'net/http'
url = URI("https://api.brevo.com/v3/smtp/email")
http = Net::HTTP.new(url.host, url.port)
http.use_ssl = true
request = Net::HTTP::Post.new(url)
request["api-key"] = ''
response = http.request(request)
puts response.read_body
```
```java response
import com.mashape.unirest.http.HttpResponse;
import com.mashape.unirest.http.Unirest;
HttpResponse response = Unirest.post("https://api.brevo.com/v3/smtp/email")
.header("api-key", "")
.asString();
```
```csharp response
using RestSharp;
var client = new RestClient("https://api.brevo.com/v3/smtp/email");
var request = new RestRequest(Method.POST);
request.AddHeader("api-key", "");
IRestResponse response = client.Execute(request);
```
````swift response
import Foundation
let headers = ["api-key": ""]
let request = NSMutableURLRequest(url: NSURL(string: "https://api.brevo.com/v3/smtp/email")! as URL,
cachePolicy: .useProtocolCachePolicy,
timeoutInterval: 10.0)
request.httpMethod = "POST"
request.allHTTPHeaderFields = headers
let session = URLSession.shared
let dataTask = session.dataTask(with: request as URLRequest, completionHandler: \{ (data, response, error) -> Void in
if (error != nil) {
print(error as Any)
} else {
let httpResponse = response as? HTTPURLResponse
print(httpResponse)
}
})
dataTask.resume()
```tp/email" />
### Response
The response includes a `messageId` that you can use to [track deliverability events](https://app.brevo.com/transactional/email/logs) for thi### Response (201)
```json
{
"messageId": "<201798300811.5787683@relay.domain.com>"
}
```tp/email" />
## Create a template with dynamic content
Create the email template in the Brevo dashboard.
### Open template creation
Open the template creation page in your Brevo dashboard.
### Configure settings
Set up your template:
- Template Name: "Order confirmation"
- Subject Line: "Your new order has been received"
- From Email: Select an existing sender
- From Name: Enter your company name
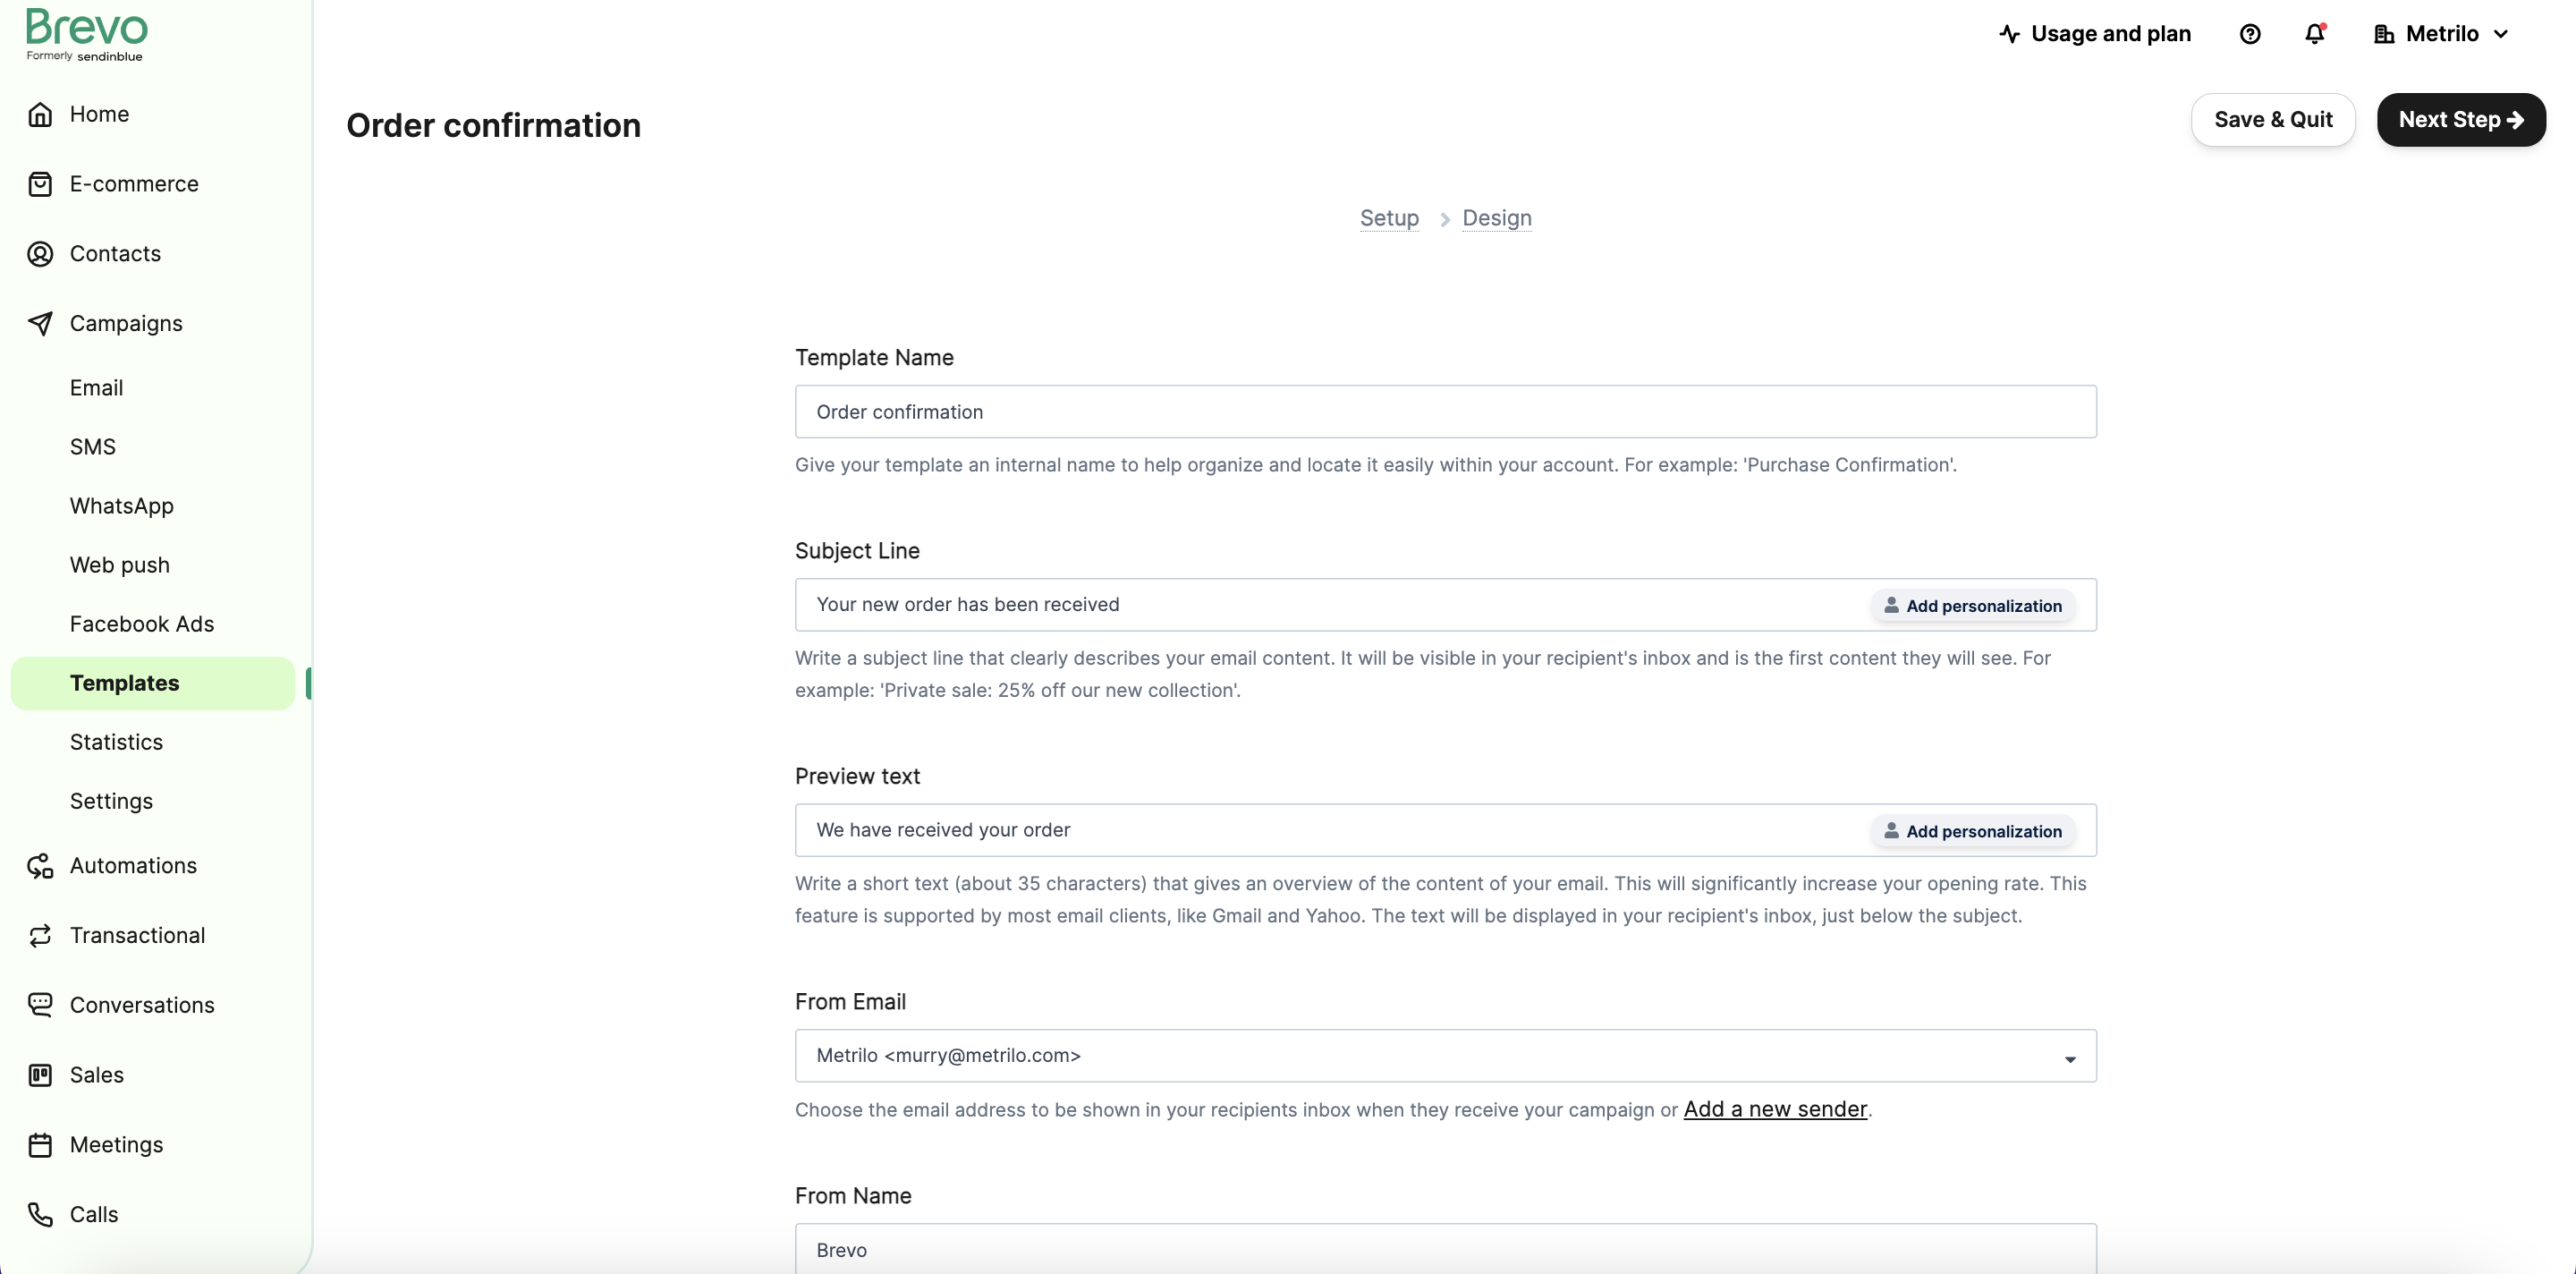
Click "Next Step".
### Import template
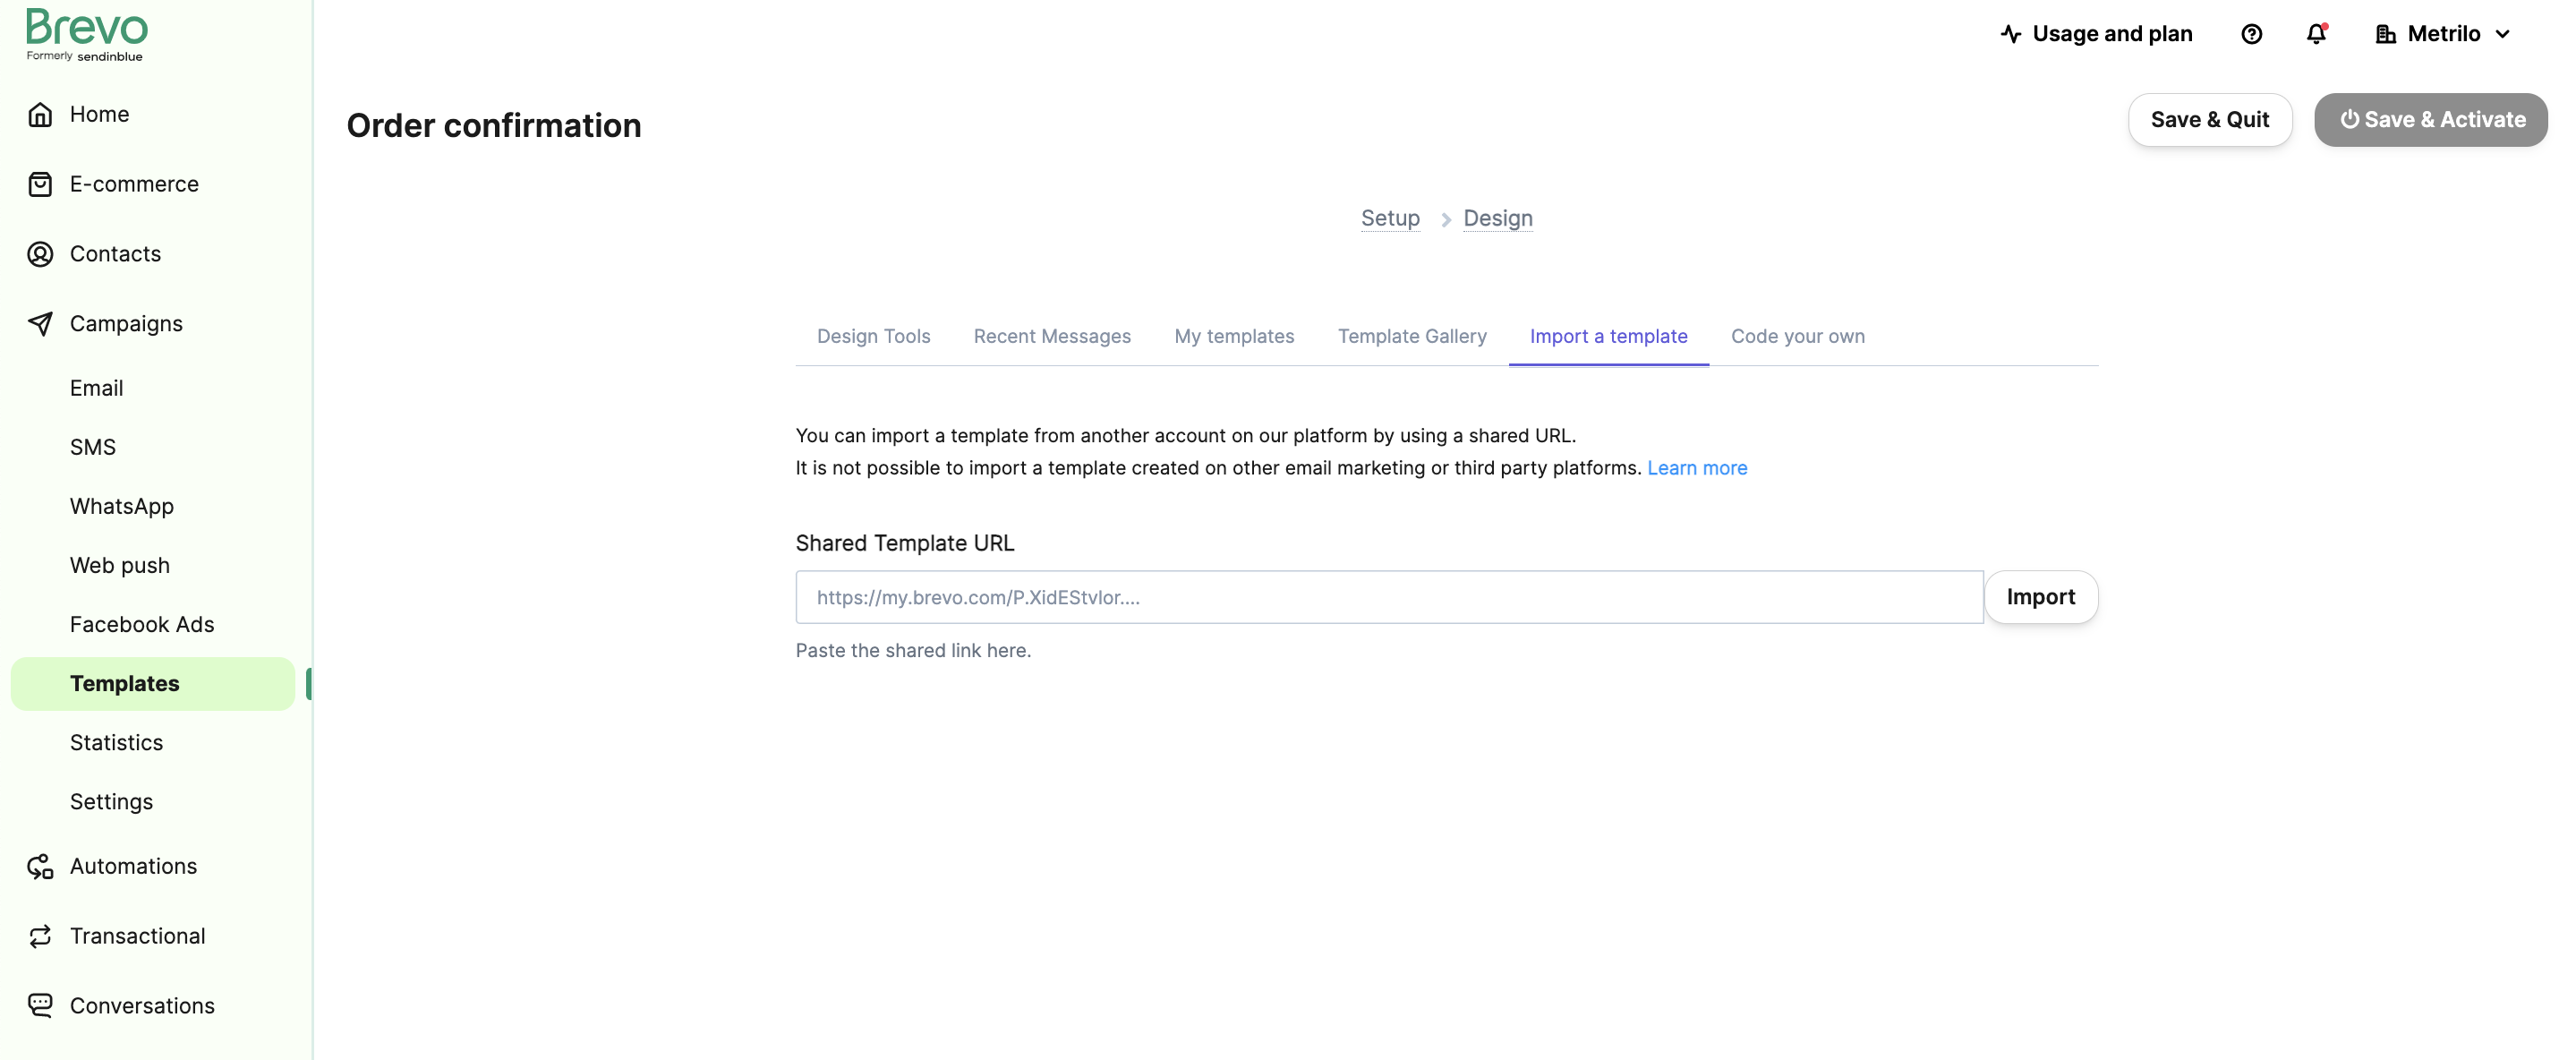
In the Design tab, select "Import a template" and paste this URL:
`https://my.brevo.com/iNF7GRiE34wzuyVRWobyyLLNbttWwwKn8CQLDhU7kui0HXu4tZG_ZzZ6Ng--`
### Save and activate
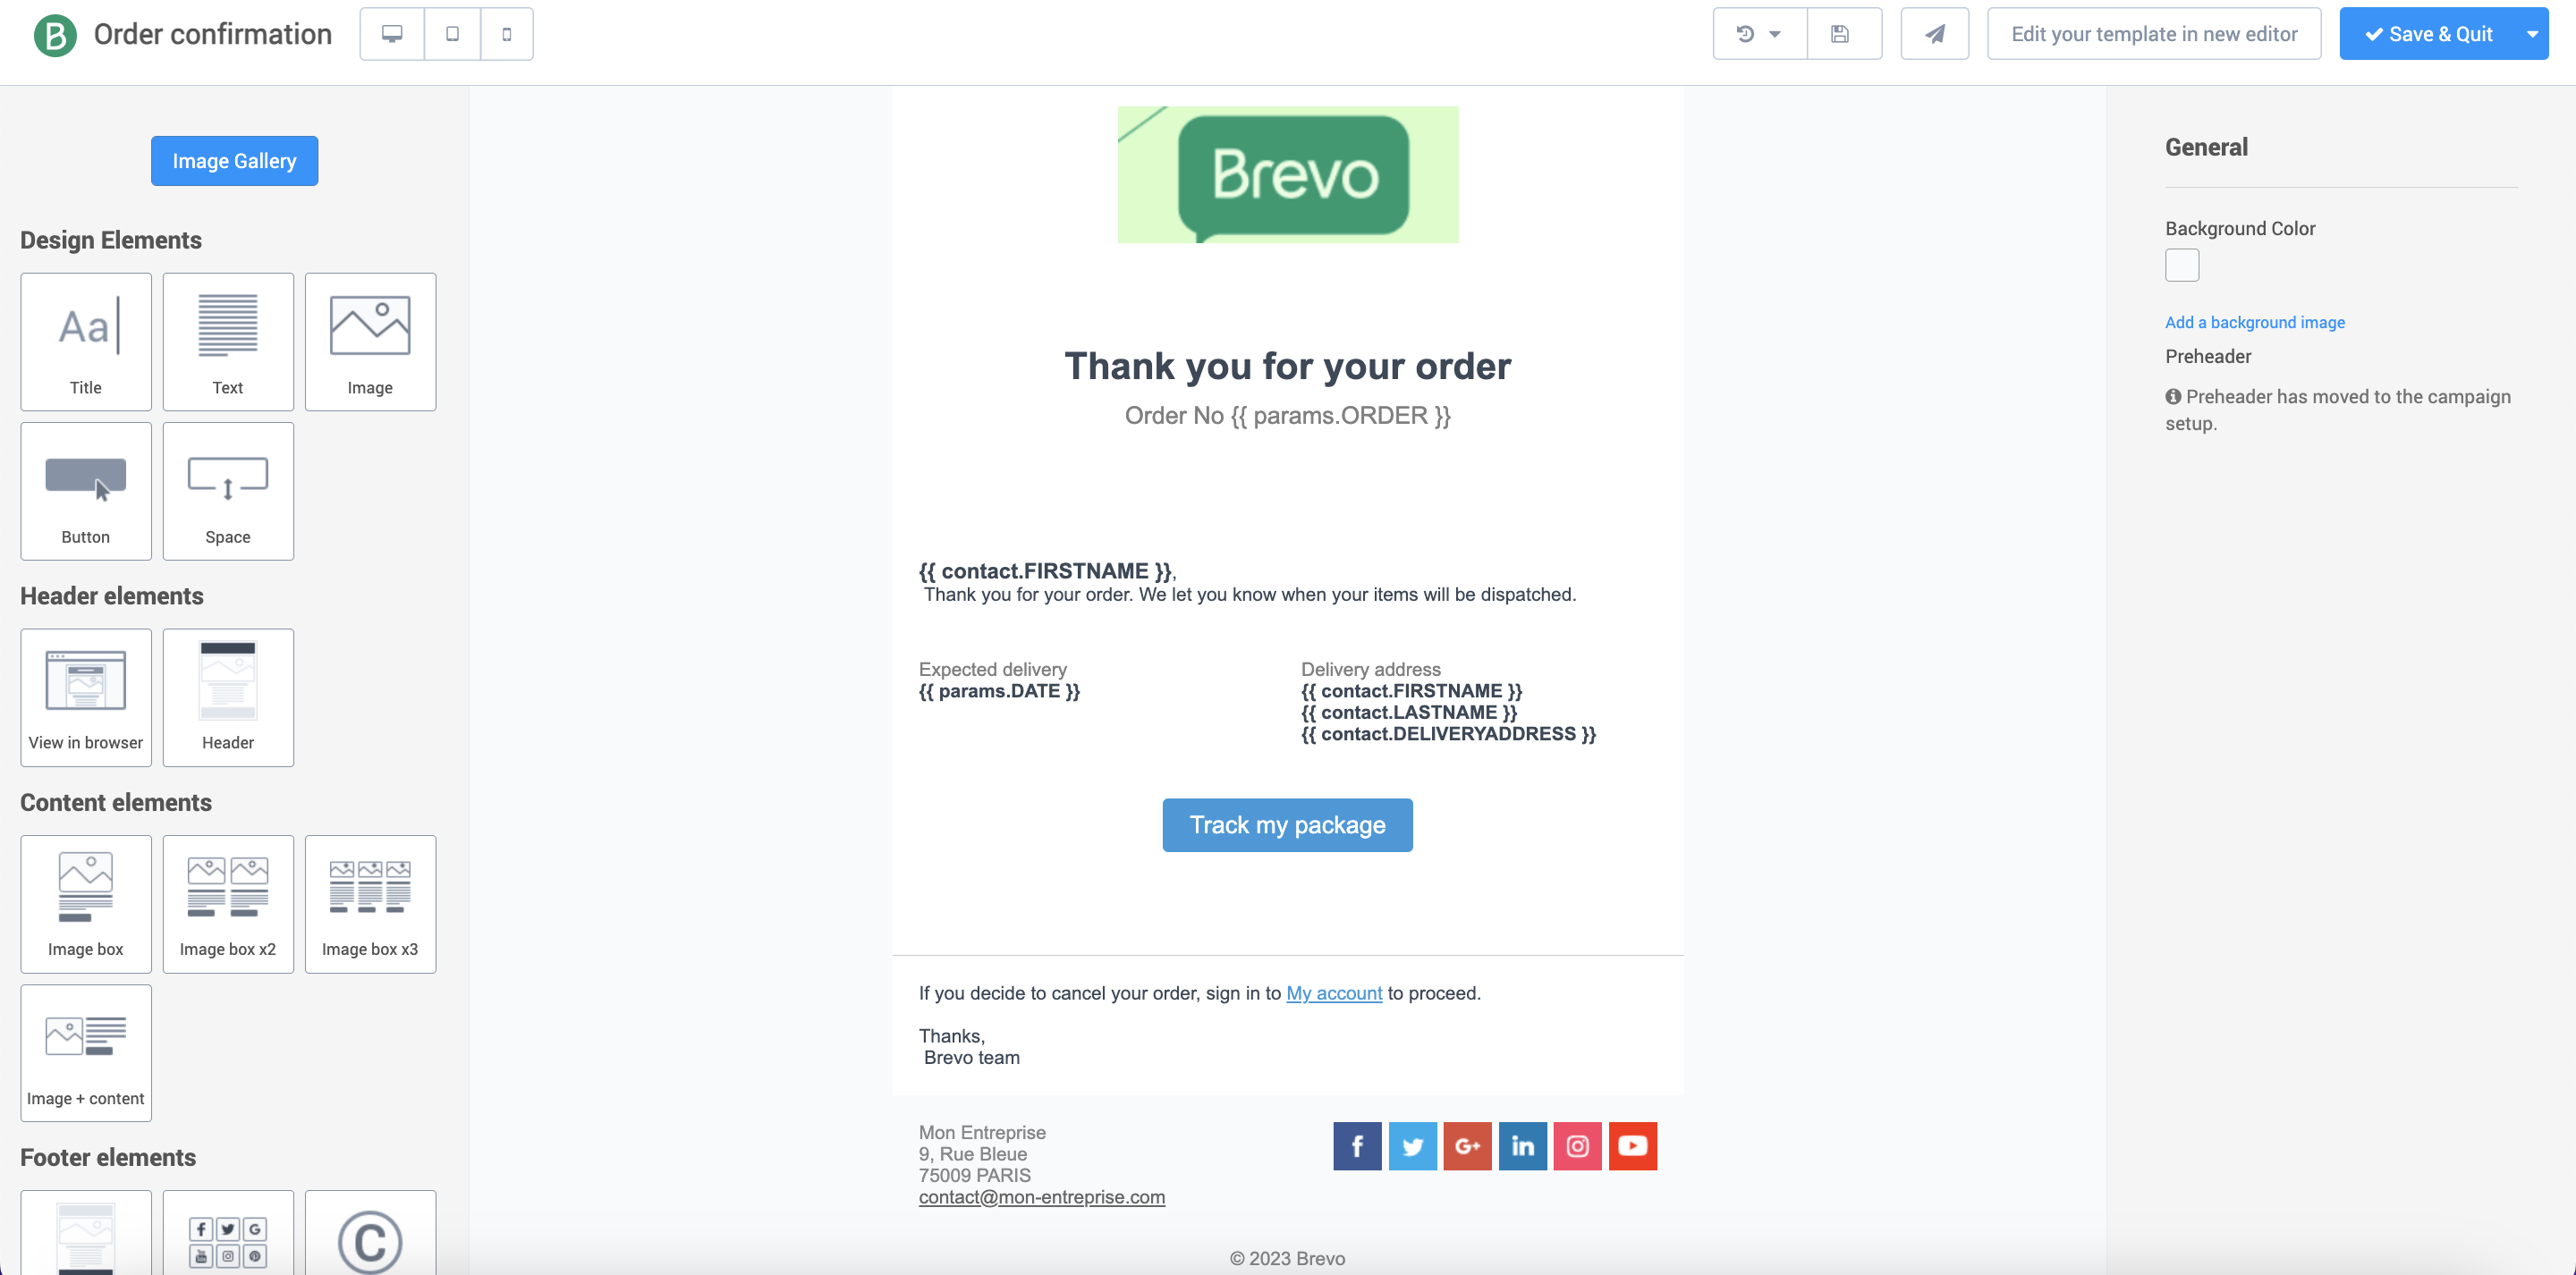
Click "Import", then "Save & Quit". On the next page, click "Save and Activate".
### Get template ID
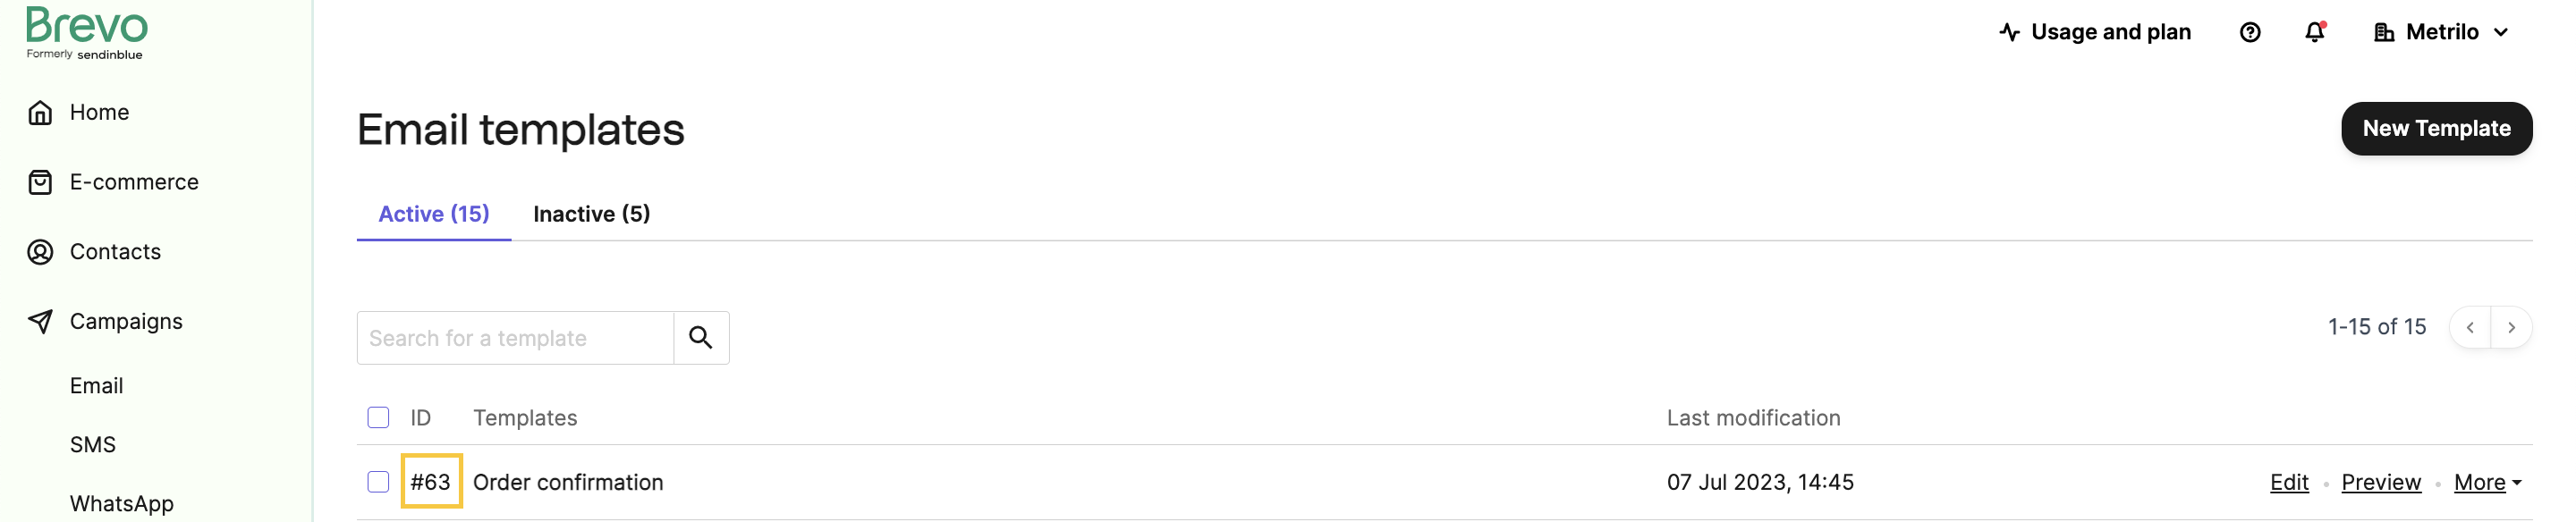
Return to the templates page and note the template ID (the number after "#" in the template name). You need this for API requests.
You can also create templates via the API using the [Create an SMTP template](/reference/create-smtp-template) endpoint. You can pass HTML content as a string (`htmlContent`) or via a URL (`htmlUrl`).
## Add a delivery address attribute
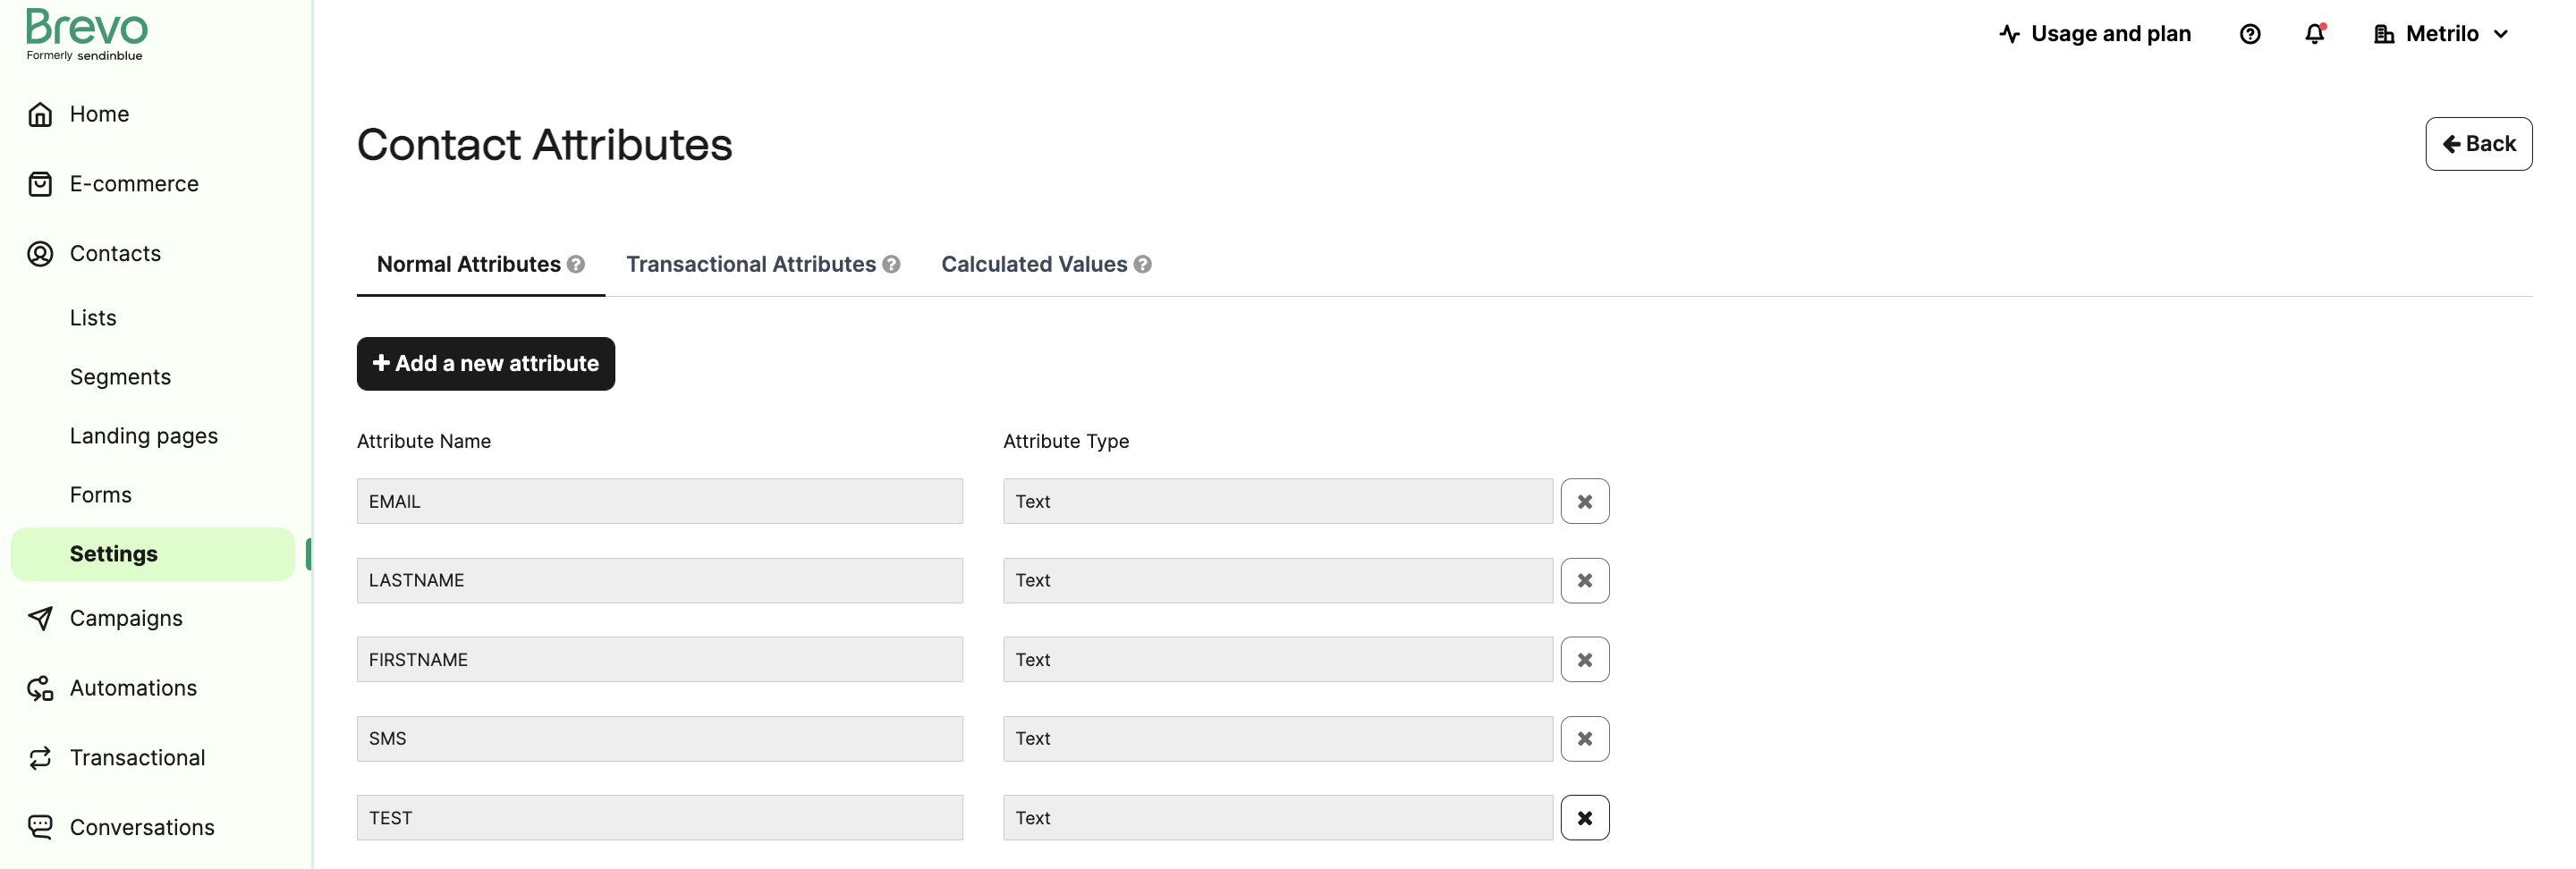
Contacts include `EMAIL`, `FIRSTNAME`, `LASTNAME`, and `SMS` by default. Add a `DELIVERYADDRESS` attribute for use in the template.
### Create attribute
Go to Contact > Settings > Contact Attributes & CRM and add a field named `DELIVERYADDRESS`.
### Add test contact
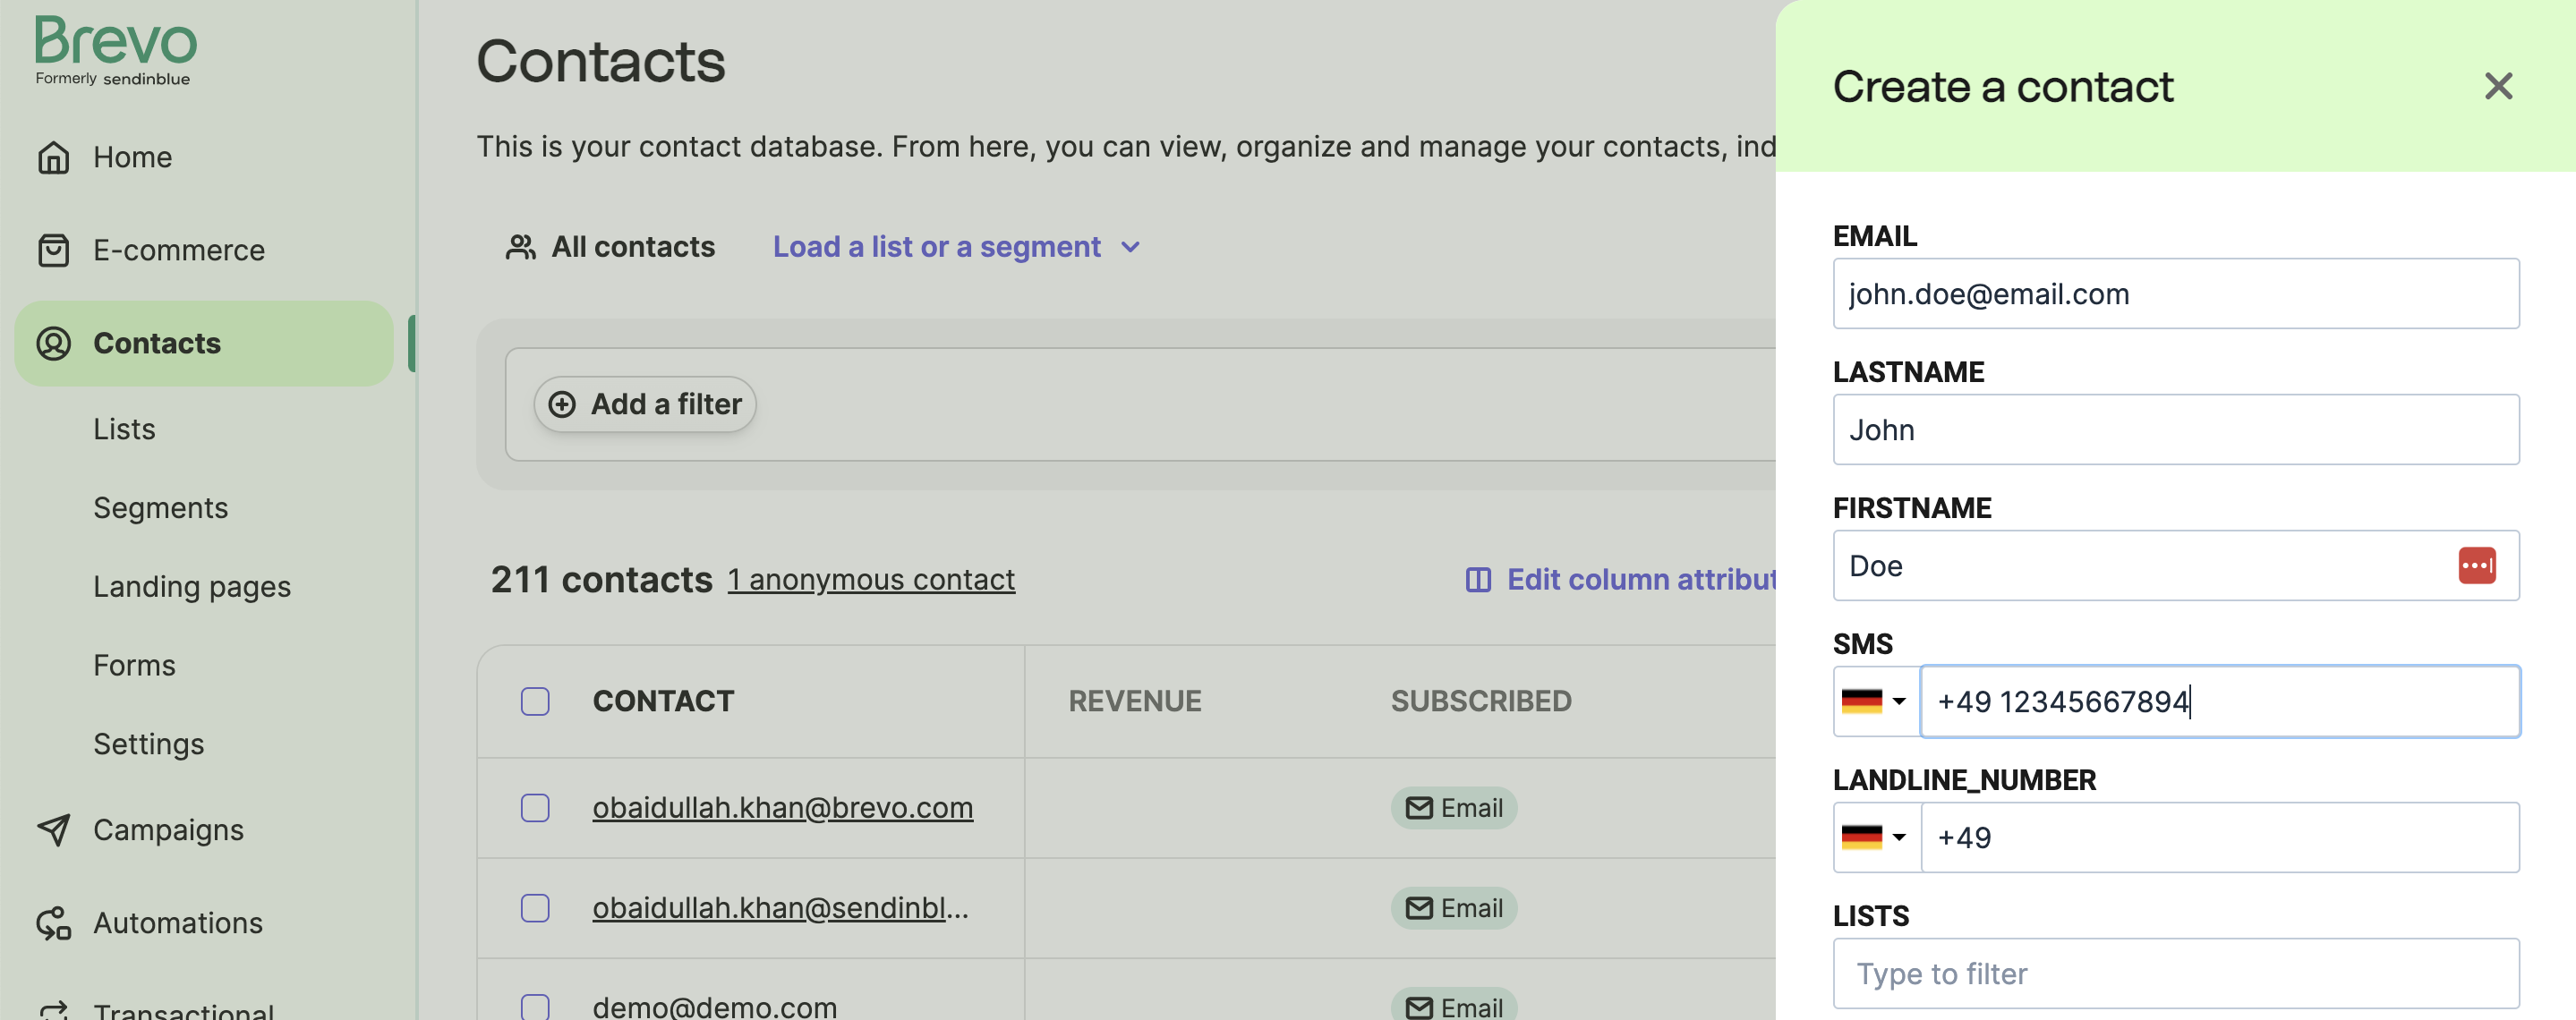
Go to your [contacts page](https://my.sendinblue.com/users/list) and create a contact with:
- **FIRSTNAME**: `John`
- **LASTNAME**: `Doe`
- **EMAIL**: Your email address
- **DELIVERYADDRESS**: `75014 Paris, France`
- **Contact list**: Select any list
Click "Save and Close".
Manage contacts via the API using [Create contact attribute](/reference/create-attribute) and [Create a contact](/reference/create-contact). For importing contacts, see [synchronize contact lists](/docs/synchronise-contact-lists).
## Send the transactional email
Use the [Send a transactional email](/reference/send-transac-email) endpoint.
### Required parameters
- `sender`: Sender email and name (must be [registered and verified](https://account.sendinblue.com/senders))
- `name` overrides your default sender name
- `to`: Recipient email and name
- Email must be a Brevo contact assigned to a contact list
- Contact must have `FIRSTNAME`, `LASTNAME`, `EMAIL`, and `DELIVERYADDRESS` attributes
- `name` appears in email headers only
- `templateId`: Template ID from the [templates page](https://app-smtp.sendinblue.com/templates) or the [list templates endpoint](/reference/get-smtp-templates)
- `params`: Transactional parameters, e.g., `{"ORDER": 12345, "DATE": "12/06/2019"}`
### Test in API reference
Test the endpoint in the [API Reference](/reference/send-transac-email). Click "Try it" and enter your API key.
The API reference interface doesn't support rich JSON body parameters like `params`. Use the code examples below for full functionality.
The API reference makes real API calls. Check your [rate limits](/docs/api-limits) and [credits](https://account.sendinblue.com/pricing) before testing.
### Code examples
```bash title="cURL - Using a template"
curl --request POST \
--url https://api.brevo.com/v3/smtp/email \
--header 'accept: application/json' \
--header 'api-key:YOUR_API_KEY' \
--header 'content-type: application/json' \
--data '{
"to":[
{
"email":"testmail@example.com",
"name":"John Doe"
}
],
"templateId":8,
"params":{
"name":"John",
"surname":"Doe"
},
"headers":{
"X-Mailin-custom":"custom_header_1:custom_value_1|custom_header_2:custom_value_2|custom_header_3:custom_value_3",
"charset":"iso-8859-1"
}
}'
````
```bash title="cURL - Using HTML content"
curl --request POST \
--url https://api.brevo.com/v3/smtp/email \
--header 'accept: application/json' \
--header 'api-key:YOUR_API_KEY' \
--header 'content-type: application/json' \
--data '{
"sender":{
"name":"Sender Alex",
"email":"senderalex@example.com"
},
"to":[
{
"email":"testmail@example.com",
"name":"John Doe"
}
],
"subject":"test mail",
"htmlContent":"Hello this is a test email from sib
",
"headers":{
"X-Mailin-custom":"custom_header_1:custom_value_1|custom_header_2:custom_value_2|custom_header_3:custom_value_3",
"charset":"iso-8859-1"
}
}'
```
\
Include these headers in each request:
* `api-key: xkeysib-xxxxxxxxxxxxxxxxx`
* `content-type: application/json`
* `accept: application/json`
Check your inbox for the email.
## Track email events with webhooks
Set up webhooks to track email status. Available events:
**Sent, Delivered, Opened, Clicked, Soft Bounce, Hard Bounce, Invalid Email, Deferred, Complaint, Unsubscribed, Blocked, Error**
### Create webhook
Go to the [transactional webhooks page](https://app-smtp.sendinblue.com/webhook#modal-add-webhook) and:
* Enter your server URL to receive webhook events
* Select events to track

Manage webhooks via the API using [Create a webhook](/reference/create-webhook) and [Update a webhook](/reference/update-webhook).
### Send test email with tags
After selecting the `delivered` event (or any other event), send a test email. Brevo POSTs event data to your URL when the event occurs.
Add `tags` to identify events in your system:
```bash
curl --request POST \
--url https://api.brevo.com/v3/smtp/email \
--header 'accept: application/json' \
--header 'api-key: xkeysib-xxxxxxxxxxx' \
--header 'content-type: application/json' \
--data '{
"sender":{"email":"sender@example.com"},
"to":[{"email":"recipient@example.com"}],
"replyTo":{"email":"sender@example.com"},
"textContent":"This is a transactional email",
"subject":"Subject Line",
"tags":["myFirstTransactional"]
}'
```
### Review webhook payload
When your email is delivered, Brevo POSTs this payload to your webhook URL:
```json
{
"event": "delivered",
"email": "example@example.com",
"id": 26224,
"date": "YYYY-MM-DD HH:mm:ss",
"ts": 1598634509,
"message-id": "",
"ts_event": 1598034509,
"subject": "Subject Line",
"tag": "[\"transactionalTag\"]",
"sending_ip": "185.41.28.109",
"ts_epoch": 1598634509223,
"tags": [
"myFirstTransactional"
]
}
```
The payload structure is consistent for all events of the same type.
See all event payload structures in the [webhook responses documentation](https://help.sendinblue.com/hc/en-us/articles/360007666479-Webhook-Responses-Email-Campaigns-Contacts).